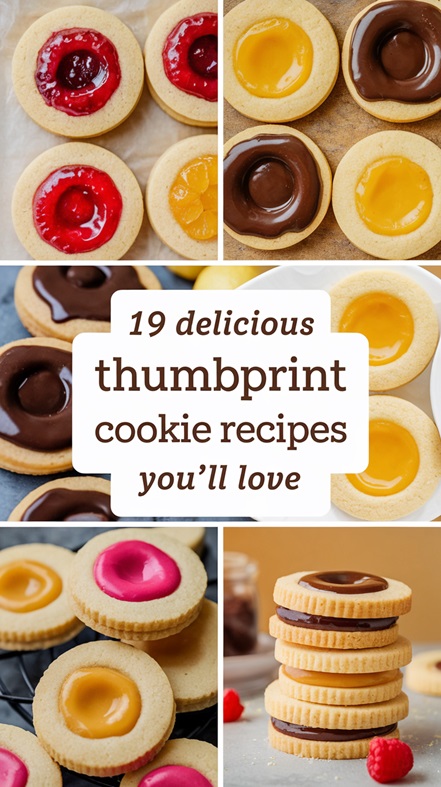
Thumbprint cookies are a delightful treat that combines a buttery, melt-in-your-mouth cookie with a sweet, fruity filling. They’re super easy to make, and you can customize them with your favorite jams or chocolates. Whether you’re baking for a special occasion or just want a sweet snack, these cookies are sure to please!
Almond Thumbprint Cookies with Raspberry Preserves
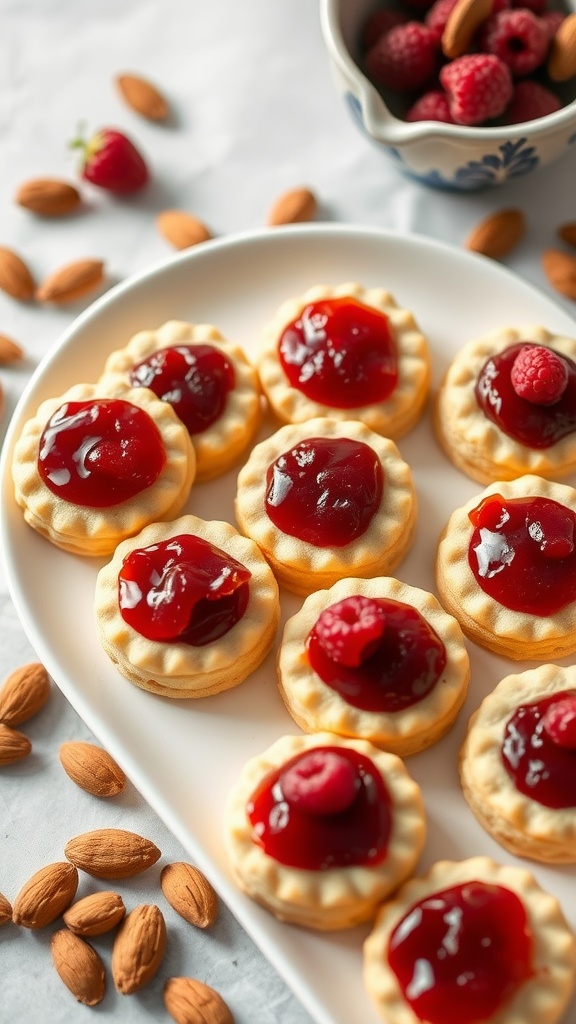
Almond thumbprint cookies are a delightful treat that combines a nutty flavor with a sweet and tangy raspberry filling. These cookies offer a perfect balance between crunch and softness, making them irresistible for any occasion. With just a handful of ingredients, this recipe is simple enough for bakers of any skill level.
Each cookie features a buttery almond base that gets a little dimple in the center, which is filled with luscious raspberry preserves. The result is a cookie that’s not only tasty but also looks beautiful on any dessert table. They’re great for holidays, parties, or just a cozy afternoon snack!
Ingredients
- 1 cup unsalted butter, softened
- 2/3 cup powdered sugar
- 1 teaspoon vanilla extract
- 1/2 teaspoon almond extract
- 2 cups all-purpose flour
- 1/4 teaspoon salt
- 1/2 cup raspberry preserves
- 1/2 cup finely chopped almonds (optional)
Instructions
- Preheat the oven to 350°F (175°C). Line a baking sheet with parchment paper.
- In a large bowl, cream together the softened butter and powdered sugar until light and fluffy. Stir in the vanilla and almond extracts.
- Gradually mix in the flour and salt until just combined. If using, fold in the chopped almonds for added texture.
- Roll the dough into small balls, about 1 inch in diameter, and place them on the prepared baking sheet. Use your thumb to make an indentation in each ball.
- Fill each indentation with a small spoonful of raspberry preserves.
- Bake for 12-15 minutes, or until the edges are lightly golden. Let the cookies cool on the baking sheet for a few minutes before transferring them to a wire rack to cool completely.
Coconut Thumbprint Cookies with Pineapple Filling
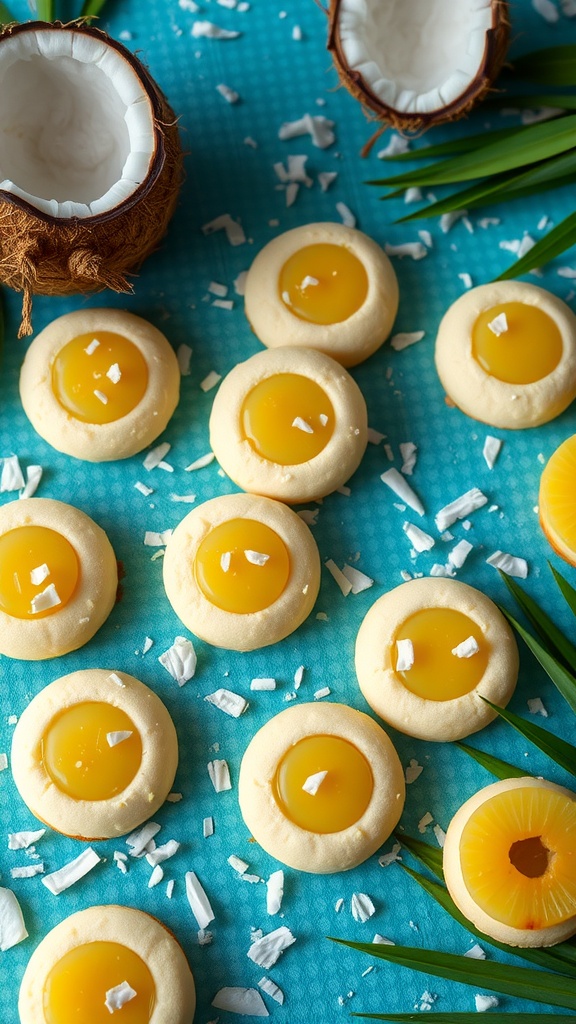
Coconut thumbprint cookies are a delightful treat that brings a taste of the tropics to your baking plate. These cookies have a soft and chewy texture, enhanced by the sweet flavor of coconut and brightened by a luscious pineapple filling. They’re simple to make, making them a great option for both novice bakers and those with more experience.
Each cookie is a little burst of sunshine, combining creamy coconut with a tangy, fruity center. They’re perfect for sharing at gatherings or enjoying with a cup of tea or coffee. Plus, the preparation is straightforward, allowing you to whip up a batch in no time!
Ingredients
- 1 cup unsweetened shredded coconut
- 1/2 cup unsalted butter, softened
- 1/4 cup granulated sugar
- 1/4 cup powdered sugar
- 1 large egg yolk
- 1 teaspoon vanilla extract
- 1 1/2 cups all-purpose flour
- 1/2 teaspoon baking powder
- 1/4 teaspoon salt
- 1/2 cup pineapple preserves or jam
Instructions
- Preheat the Oven: Start by preheating your oven to 350°F (175°C). Line a baking sheet with parchment paper.
- Make the Dough: In a mixing bowl, cream together the softened butter, granulated sugar, and powdered sugar until light and fluffy. Add the egg yolk and vanilla extract, mixing until well combined. Gradually incorporate the flour, baking powder, and salt until a soft dough forms. Fold in the shredded coconut.
- Shape the Cookies: Scoop tablespoon-sized portions of dough and roll them into balls. Place them on the prepared baking sheet, spacing them a couple of inches apart. Use your thumb to make an indentation in the center of each ball.
- Add the Filling: Spoon a small amount of pineapple preserves into the indentation of each cookie.
- Bake: Bake the cookies in the preheated oven for about 12-15 minutes or until the edges are lightly golden. Allow them to cool on the baking sheet for a few minutes before transferring to a wire rack to cool completely.
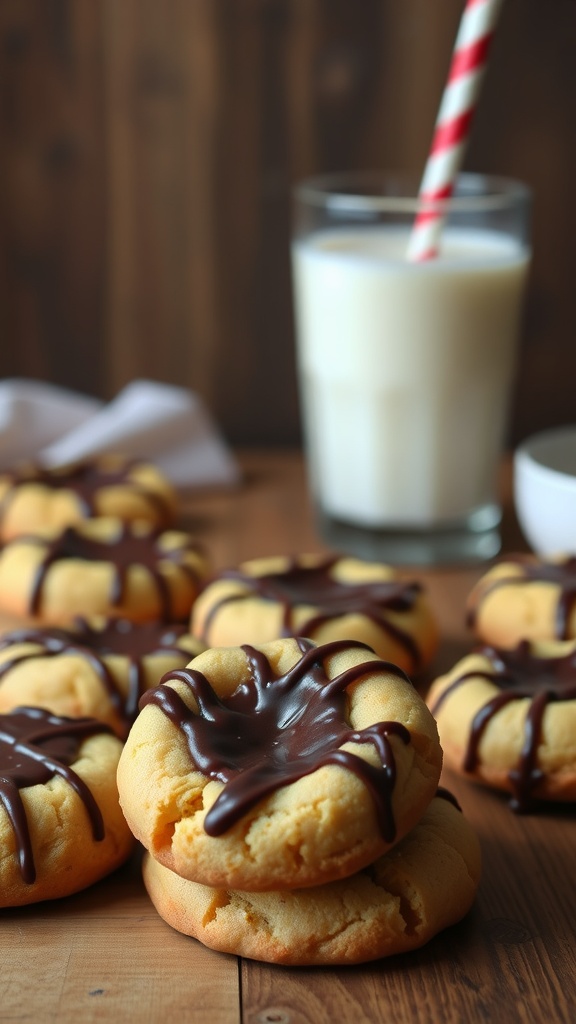
Chocolate Thumbprint Cookies with Nutella
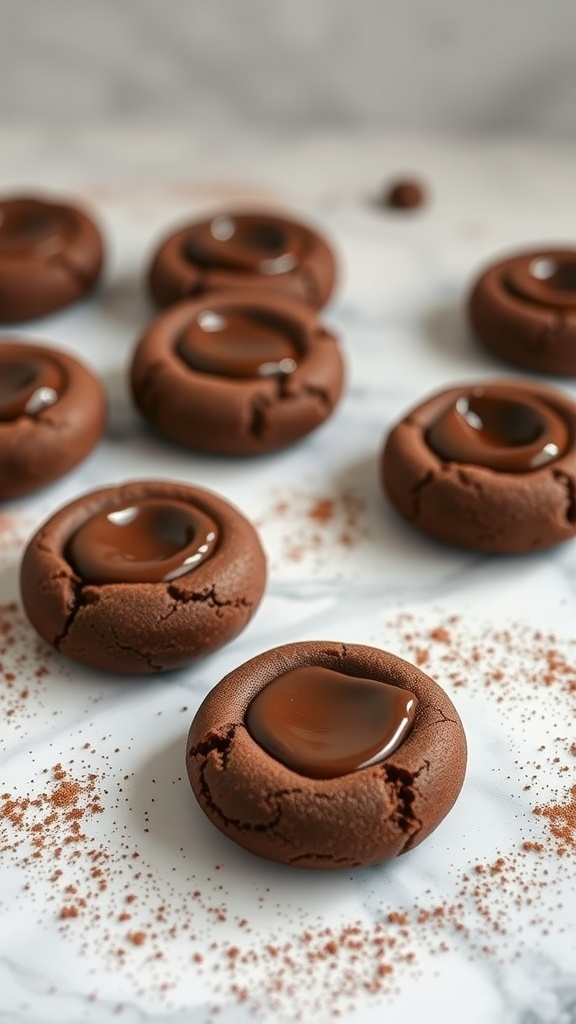
If you’re in the mood for something sweet and simple, chocolate thumbprint cookies with Nutella are just the treat. These deliciously soft cookies have a rich chocolate flavor, and the gooey Nutella filling takes them to the next level. They’re perfect for sharing with friends or enjoying all on your own!
The best part? These cookies are easy to make and require minimal ingredients. Even if you’re not an experienced baker, you’ll find this recipe approachable and fun. Let’s dive into making these delightful treats!
Ingredients
- 1 cup all-purpose flour
- 1/3 cup unsweetened cocoa powder
- 1/2 teaspoon baking powder
- 1/4 teaspoon salt
- 1/2 cup unsalted butter, softened
- 1/2 cup granulated sugar
- 1 large egg yolk
- 1 teaspoon vanilla extract
- 1/2 cup Nutella
Instructions
- Preheat the Oven: Start by preheating your oven to 350°F (175°C) and lining a baking sheet with parchment paper.
- Mix the Dry Ingredients: In a bowl, whisk together the flour, cocoa powder, baking powder, and salt until combined.
- Cream the Butter and Sugar: In a separate bowl, beat the softened butter and granulated sugar until fluffy. Add the egg yolk and vanilla extract, and mix until smooth.
- Combine Ingredients: Gradually add the dry mixture to the wet ingredients, stirring until a soft dough forms.
- Shape the Cookies: Scoop tablespoon-sized portions of dough, roll them into balls, and place them on the prepared baking sheet. Gently press your thumb into the center of each ball to make an indent.
- Add Nutella: Spoon a small amount of Nutella into each thumbprint, filling the indent.
- Bake: Place the cookies in the oven and bake for about 10-12 minutes. Allow them to cool on the baking sheet for a few minutes before transferring them to a wire rack to cool completely.
Classic Thumbprint Cookies with Jam Filling
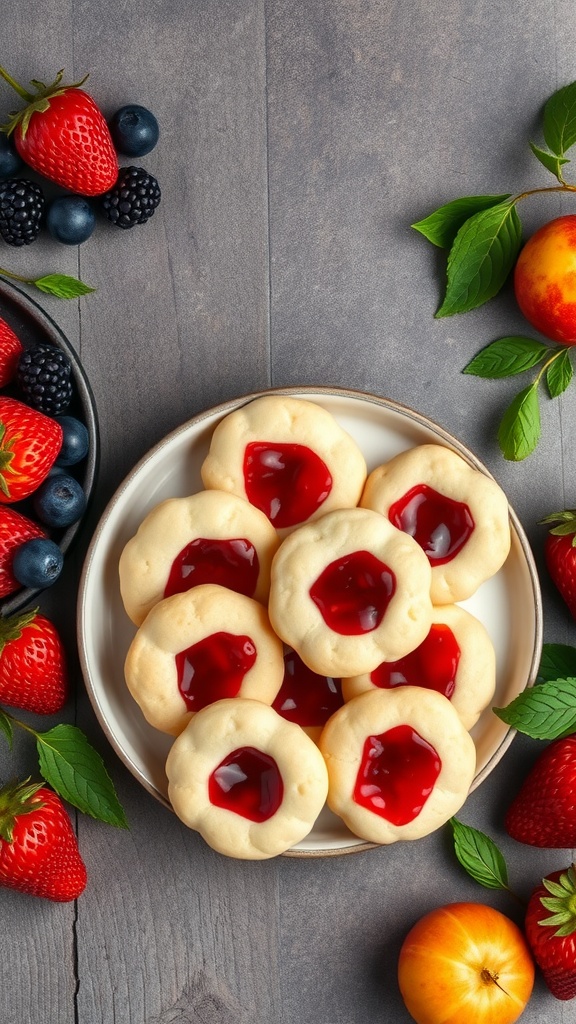
Thumbprint cookies are a delightful treat that combines a buttery cookie base with a sweet jam center. They’re easy to make and perfect for any occasion, whether it’s a cozy afternoon snack or a festive dessert at a gathering. The charming little indentations, created by your thumb (or the back of a spoon), hold a dollop of your favorite jam, adding a pop of flavor and color.
These cookies bake up soft and slightly chewy, with a lovely balance of sweetness and buttery richness. The jam filling provides a fruity contrast that complements the cookie beautifully. Plus, you can customize them with different jams or jellies to suit your taste. Let’s get started on making these delightful classic thumbprint cookies!
Ingredients
- 1 cup unsalted butter, softened
- 1/2 cup granulated sugar
- 1/2 cup powdered sugar
- 1 teaspoon vanilla extract
- 2 cups all-purpose flour
- 1/4 teaspoon salt
- 1/2 cup fruit jam (your choice)
Instructions
- Prepare the Dough: In a large bowl, cream together the softened butter, granulated sugar, and powdered sugar until light and fluffy. Mix in the vanilla extract.
- Combine Ingredients: Gradually add the flour and salt to the butter mixture, mixing until just combined. Be careful not to overmix.
- Shape the Cookies: Preheat your oven to 350°F (175°C). Scoop out small portions of dough and roll them into balls. Place them on a baking sheet lined with parchment paper.
- Create the Thumbprint: Use your thumb or a spoon to make an indentation in the center of each cookie ball.
- Fill with Jam: Spoon a small amount of jam into each indentation, being careful not to overfill.
- Bake: Bake the cookies in the preheated oven for about 12-15 minutes, or until the edges are lightly golden. Allow them to cool on the baking sheet for a few minutes before transferring them to a wire rack to cool completely.
Peanut Butter Thumbprint Cookies with Chocolate Drizzle
Peanut Butter Thumbprint Cookies with Chocolate Drizzle are a delightful twist on the traditional thumbprint cookie. These cookies are rich and buttery with a creamy peanut butter flavor, and the added chocolate drizzle takes them to another level of deliciousness. They are perfect for satisfying your sweet tooth and are surprisingly simple to make, making them a go-to treat for both novice and experienced bakers.
The combination of soft, chewy cookie dough with a sweet peanut butter center and a drizzle of chocolate is a classic that never goes out of style. Whether you’re enjoying them with a glass of milk or sharing them at a gathering, these cookies are sure to be a hit!
Ingredients
- 1 cup creamy peanut butter
- 1/2 cup granulated sugar
- 1/2 cup brown sugar, packed
- 1 large egg
- 1 teaspoon vanilla extract
- 1/2 teaspoon baking soda
- 1/4 teaspoon salt
- 1/2 cup chocolate chips
Instructions
- Preheat the Oven: Start by preheating your oven to 350°F (175°C) and line a baking sheet with parchment paper.
- Make the Dough: In a large mixing bowl, combine peanut butter, granulated sugar, brown sugar, egg, vanilla extract, baking soda, and salt. Mix until well combined and the dough is smooth.
- Shape the Cookies: Scoop out tablespoon-sized portions of dough and roll them into balls. Place them on the prepared baking sheet, spacing them about 2 inches apart. Press your thumb gently in the center of each cookie to create an indentation.
- Bake: Bake the cookies in the preheated oven for about 10-12 minutes, or until they are lightly golden. Remove them from the oven and let them cool on the baking sheet for a few minutes before transferring them to a wire rack.
- Prepare the Chocolate Drizzle: While the cookies are cooling, melt the chocolate chips in a microwave-safe bowl in 30-second intervals, stirring in between until smooth. Once melted, transfer the chocolate to a piping bag or a zip-top bag with a corner snipped off.
- Drizzle and Serve: Drizzle the melted chocolate over the cooled cookies. Let the chocolate set for a few minutes before serving. Enjoy your Peanut Butter Thumbprint Cookies with Chocolate Drizzle!
Spiced Thumbprint Cookies with Maple Glaze

These spiced thumbprint cookies offer a delightful balance of buttery richness and warm spices, making them a perfect treat for any occasion. The sweet and sticky maple glaze adds a lovely finish, enhancing the flavors of the cookies.
Not only are they delicious, but they’re also easy to whip up, making them a wonderful choice for both beginners and experienced bakers. You can customize the filling with your favorite jam or preserve, allowing for a personal touch!
Ingredients
- 1 cup unsalted butter, softened
- 3/4 cup granulated sugar
- 1 teaspoon vanilla extract
- 2 cups all-purpose flour
- 1/2 teaspoon baking powder
- 1/4 teaspoon salt
- 1 teaspoon ground cinnamon
- 1/2 teaspoon ground ginger
- 1/4 teaspoon ground nutmeg
- 1/2 cup fruit jam (your choice)
- 1/4 cup maple syrup
Instructions
- Preheat the oven to 350°F (175°C) and line a baking sheet with parchment paper.
- In a large bowl, cream together the softened butter and granulated sugar until light and fluffy. Mix in the vanilla extract.
- In another bowl, whisk together the flour, baking powder, salt, cinnamon, ginger, and nutmeg.
- Gradually add the dry ingredients to the butter mixture until combined. The dough should be soft and slightly sticky.
- Roll tablespoon-sized portions of the dough into balls and place them on the prepared baking sheet. Using your thumb, make an indentation in the center of each ball.
- Fill each indentation with a teaspoon of fruit jam.
- Bake for 12-15 minutes or until the edges are lightly golden. Let them cool on the baking sheet for a few minutes before transferring to a wire rack.
- While the cookies cool, prepare the maple glaze by combining the maple syrup with a little powdered sugar to thicken (optional). Drizzle over the cooled cookies.
Vegan Thumbprint Cookies with Fruit Compote
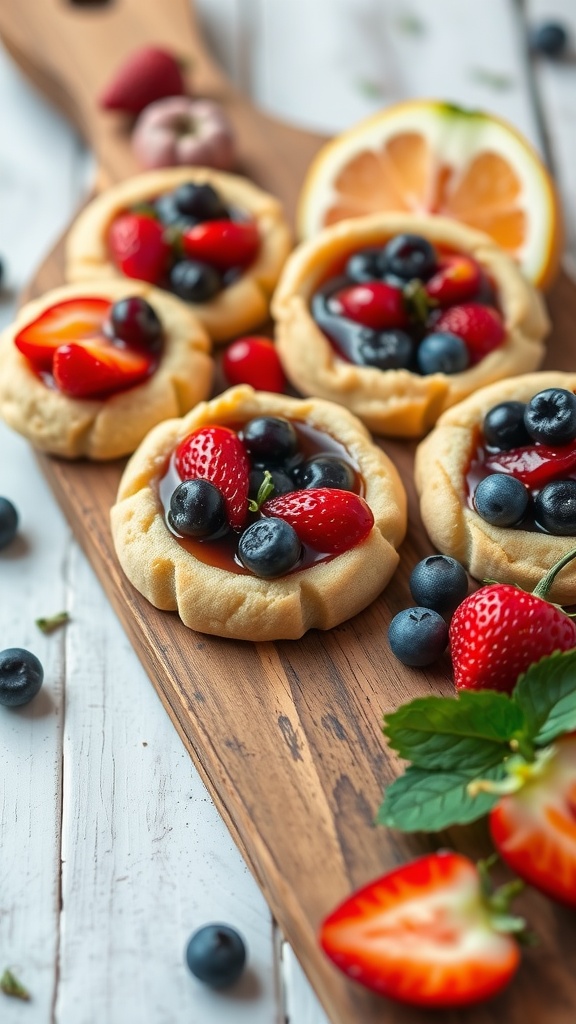
Vegan thumbprint cookies are a delightful treat that combines a tender, buttery base with a sweet fruit compote center. These cookies have a satisfying texture and a burst of fruity flavor that makes each bite enjoyable. Plus, they’re simple to make, perfect for both baking novices and seasoned pros.
These cookies are not only vegan but also customizable. You can use your favorite fruits for the compote, whether it’s strawberries, blueberries, or a mix of berries. They make a lovely addition to any gathering or a sweet snack to enjoy at home. Here’s a delicious recipe for you to try:
Ingredients
- 1 cup almond flour
- 1 cup all-purpose flour
- 1/2 cup coconut oil, melted
- 1/2 cup maple syrup
- 1 teaspoon vanilla extract
- 1/4 teaspoon salt
- 1 cup mixed berries (fresh or frozen)
- 2 tablespoons sugar (for compote)
- 1 tablespoon lemon juice
Instructions
- Make the Cookie Dough: In a mixing bowl, combine almond flour, all-purpose flour, melted coconut oil, maple syrup, vanilla extract, and salt. Mix until a dough forms.
- Form the Cookies: Preheat your oven to 350°F (175°C). Roll the dough into balls and place them on a baking sheet lined with parchment paper. Use your thumb to create an indentation in the center of each ball.
- Prepare the Fruit Compote: In a small saucepan, combine mixed berries, sugar, and lemon juice. Cook over medium heat until the berries break down and the mixture thickens, about 5-7 minutes.
- Fill the Cookies: Spoon a small amount of the fruit compote into each indentation in the cookies.
- Bake: Bake for 12-15 minutes, or until the edges are lightly golden. Allow to cool on a wire rack before serving.
Matcha Thumbprint Cookies with Green Tea Filling

These Matcha Thumbprint Cookies are a delightful twist on the traditional thumbprint cookie. With their light, buttery texture and a vibrant green tea filling, they offer a unique blend of flavors that are both sweet and earthy. Plus, they’re easy to make, making them a fun baking project for anyone, whether you’re a novice or an experienced baker.
The subtle bitterness of matcha perfectly complements the sweetness of the cookie, creating a balanced treat that pairs wonderfully with a cup of tea. These cookies not only look beautiful with their bright green centers but also taste fantastic, making them a great addition to any dessert table or a perfect snack for your afternoon tea.
Ingredients
- 1 cup unsalted butter, softened
- 1 cup granulated sugar
- 1 large egg
- 1 teaspoon vanilla extract
- 2 cups all-purpose flour
- 1/4 cup matcha green tea powder
- 1/2 teaspoon baking powder
- 1/4 teaspoon salt
- 1/2 cup sweetened condensed milk
Instructions
- Preheat the oven to 350°F (175°C) and line a baking sheet with parchment paper.
- In a large bowl, cream together the softened butter and granulated sugar until light and fluffy. Beat in the egg and vanilla extract until well combined.
- In another bowl, whisk together the flour, matcha powder, baking powder, and salt. Gradually mix the dry ingredients into the wet mixture until a dough forms.
- Roll the dough into small balls and place them on the prepared baking sheet. Use your thumb or the back of a spoon to create an indentation in the center of each ball.
- Fill each indentation with a small amount of sweetened condensed milk.
- Bake for 12-15 minutes or until the edges are lightly golden. Allow the cookies to cool on the baking sheet for a few minutes before transferring them to a wire rack to cool completely.
Lavender Thumbprint Cookies with Honey Filling

These Lavender Thumbprint Cookies with Honey Filling are a delightful treat that brings a unique twist to the classic thumbprint cookie. The floral notes of lavender combined with the sweetness of honey create a lovely flavor profile that’s both refreshing and comforting. They’re surprisingly easy to make, perfect for a relaxed baking afternoon or when you want to impress guests with something a little different.
The buttery cookie base is infused with dried lavender, while a gooey honey filling adds a touch of richness. The result is a cookie that melts in your mouth with each bite. Grab a cup of tea, and enjoy these delightful cookies that are sure to brighten any day!
Ingredients
- 1 cup unsalted butter, softened
- 1/2 cup granulated sugar
- 2 cups all-purpose flour
- 1/4 teaspoon salt
- 1 tablespoon dried culinary lavender
- 1/4 cup honey
- 1 egg yolk
- 1 teaspoon vanilla extract
Instructions
- Prepare the Dough: In a large bowl, cream together the softened butter and sugar until light and fluffy. Add the egg yolk and vanilla extract, mixing well.
- Mix Dry Ingredients: In another bowl, whisk together the flour, salt, and dried lavender. Gradually add this mixture to the butter mixture until combined.
- Shape the Cookies: Preheat the oven to 350°F (175°C). Roll the dough into small balls and place them on a lined baking sheet. Use your thumb or the back of a spoon to create an indentation in the center of each cookie.
- Add the Filling: Spoon a small amount of honey into the center of each cookie.
- Bake: Bake the cookies for 12-15 minutes, or until the edges are lightly golden. Let them cool on a wire rack before serving.
Shortbread Thumbprint Cookies with Lemon Curd
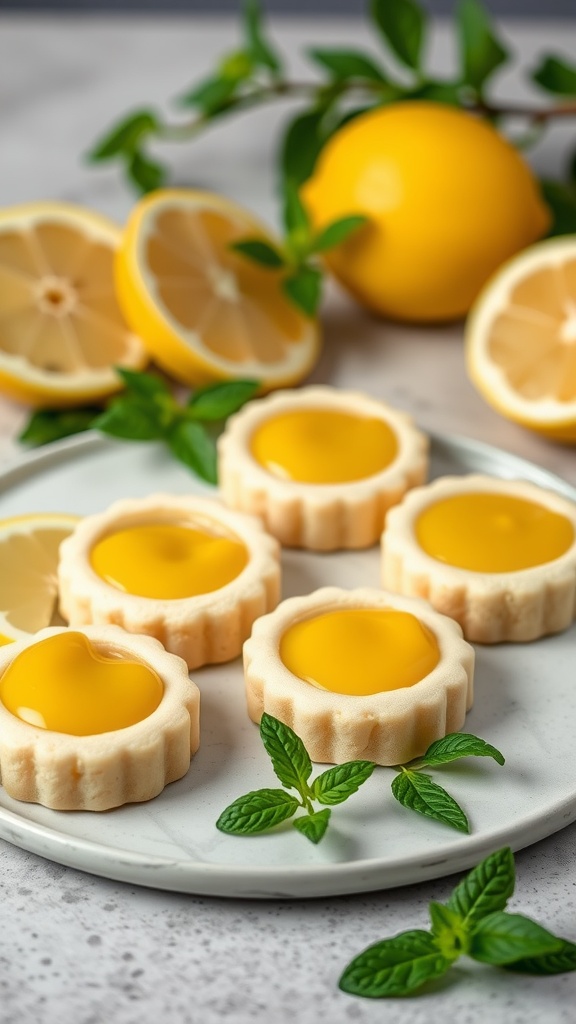
Shortbread thumbprint cookies with lemon curd are a delightful treat that combines the buttery richness of shortbread with the bright, zesty flavor of lemon. These cookies are not only simple to make but also bring a cheerful touch to any dessert table. Perfect for tea time or as a sweet snack, they offer a refreshing bite that’s sure to please.
The crumbly texture of the shortbread pairs beautifully with the smooth, tangy lemon curd. Each cookie is easy to prepare and is a fun project for bakers of all levels. Whether you’re hosting a gathering or simply enjoying a quiet afternoon, these cookies are a lovely addition to your baking repertoire.
Ingredients
- 1 cup unsalted butter, softened
- 1/2 cup powdered sugar
- 1 teaspoon vanilla extract
- 2 cups all-purpose flour
- 1/4 teaspoon salt
- 1/2 cup lemon curd
Instructions
- Preheat the oven to 350°F (175°C). Line a baking sheet with parchment paper.
- In a large bowl, cream together the softened butter and powdered sugar until light and fluffy. Stir in the vanilla extract.
- Gradually add the flour and salt, mixing until just combined. The dough should be soft but not sticky.
- Using your hands, form small balls of dough and place them on the prepared baking sheet, spacing them about 2 inches apart.
- Press your thumb gently into the center of each ball to create a well for the lemon curd.
- Fill each well with lemon curd, being careful not to overfill.
- Bake for 12-15 minutes or until the edges are lightly golden. Allow to cool on the baking sheet for a few minutes before transferring to a wire rack to cool completely.
Cherry Almond Thumbprint Cookies
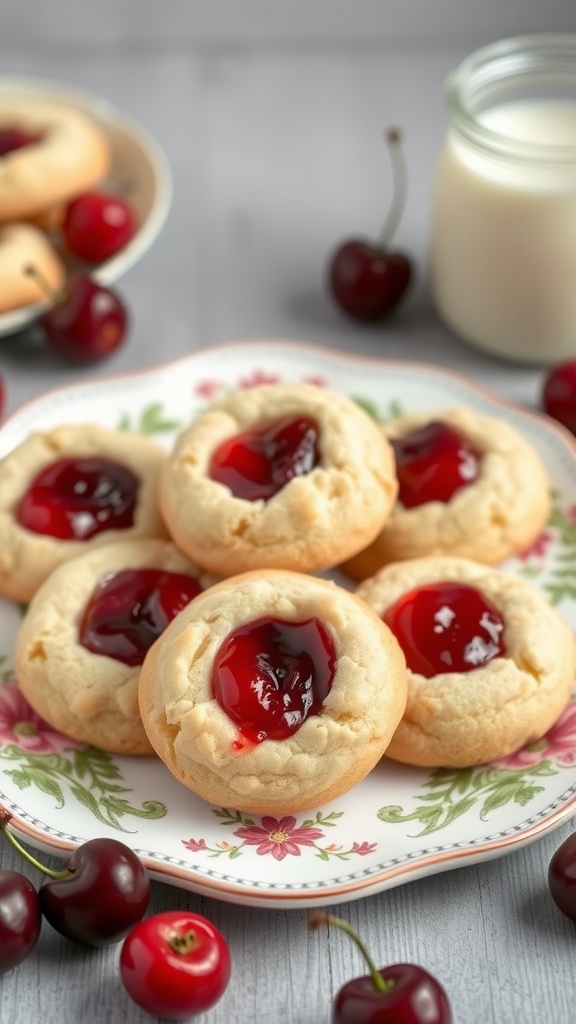
Cherry Almond Thumbprint Cookies are a delightful treat that brings together the rich flavors of almond and sweet cherry. These cookies are soft and buttery, with a lovely jam filling that adds a burst of fruity flavor in every bite. They are simple to make, making them perfect for both novice bakers and seasoned pros looking for a quick and tasty dessert.
The combination of crunchy edges and a tender center creates a pleasing texture that pairs wonderfully with the cherry jam. Whether you’re making them for a special occasion or just for a cozy afternoon snack, these cookies are sure to satisfy your sweet tooth.
Ingredients
- 1 cup unsalted butter, softened
- 1/2 cup granulated sugar
- 1/4 cup packed brown sugar
- 1 teaspoon almond extract
- 2 cups all-purpose flour
- 1/2 teaspoon salt
- 1/2 cup cherry jam
Instructions
- Preheat the Oven: Preheat your oven to 350°F (175°C) and line a baking sheet with parchment paper.
- Make the Dough: In a large bowl, cream together the softened butter, granulated sugar, and brown sugar until light and fluffy. Mix in the almond extract. Gradually add in the flour and salt, mixing until just combined.
- Shape the Cookies: Scoop tablespoon-sized portions of dough and roll them into balls. Place them on the prepared baking sheet, spacing them a couple of inches apart. Use your thumb to create an indentation in the center of each cookie.
- Add the Jam: Fill each indentation with a small spoonful of cherry jam.
- Bake: Bake the cookies in the preheated oven for about 12-15 minutes, or until the edges are lightly golden. Remove from the oven and let them cool on the baking sheet for a few minutes before transferring to a wire rack to cool completely.
Hazelnut Thumbprint Cookies with Chocolate Ganache
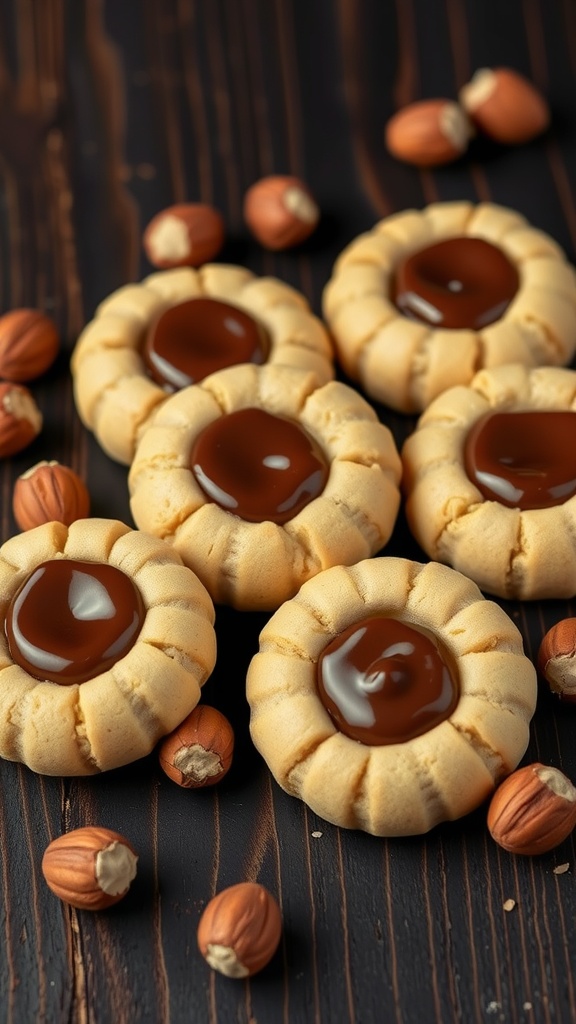
Hazelnut thumbprint cookies are a delightful treat that combines the rich, nutty flavor of hazelnuts with a smooth, luscious chocolate ganache. These cookies are not only tasty but also simple to make, making them a great choice for both novice bakers and experienced ones looking for a quick dessert. The soft, buttery texture pairs perfectly with the chocolate filling, creating a satisfying bite that’s sure to please.
The recipe is quite straightforward, requiring just a few basic ingredients. Once baked, each cookie is filled with a generous dollop of chocolate ganache, elevating them to a new level of indulgence. Whether you’re baking for a special occasion or just treating yourself, these hazelnut thumbprint cookies will leave you wanting more!
Ingredients
- 1 cup hazelnut flour
- 1/2 cup unsalted butter, softened
- 1/4 cup granulated sugar
- 1/4 teaspoon salt
- 1 teaspoon vanilla extract
- 1 cup all-purpose flour
- 1/2 cup semi-sweet chocolate chips
- 1/4 cup heavy cream
Instructions
- Preheat the Oven: Start by preheating your oven to 350°F (175°C) and lining a baking sheet with parchment paper.
- Make the Dough: In a large bowl, cream together the softened butter and sugar until light and fluffy. Add in the hazelnut flour, all-purpose flour, salt, and vanilla extract, mixing until a dough forms.
- Shape Cookies: Scoop out small amounts of dough and roll them into balls. Place them on the prepared baking sheet, leaving some space in between. Press your thumb into the center of each ball to create a well.
- Bake: Bake the cookies for 12-15 minutes, or until the edges are lightly golden. Remove them from the oven and let cool on a wire rack.
- Prepare the Ganache: In a small saucepan, heat the heavy cream until just simmering. Remove from heat and add the chocolate chips, stirring until smooth and melted.
- Fill the Cookies: Once the cookies have cooled, spoon the chocolate ganache into the thumbprint wells of each cookie. Allow the ganache to set before serving.
Pistachio Thumbprint Cookies with Rose Water

Pistachio thumbprint cookies are a delightful treat, combining nutty flavors with a touch of floral sweetness from rose water. They’re soft and buttery with a subtle crunch from the pistachios, topped off with a sweet jam or chocolate center. These cookies are not only delicious but also simple to make, appealing to bakers of all levels.
The unique combination of pistachios and rose water adds an exotic flair to traditional thumbprint cookies, making them perfect for special occasions or a cozy afternoon snack. Enjoy them with tea or coffee for a little indulgence!
Ingredients
- 1 cup unsalted butter, softened
- 1/2 cup powdered sugar
- 1 teaspoon vanilla extract
- 1 teaspoon rose water
- 2 cups all-purpose flour
- 1/2 cup finely chopped pistachios
- 1/4 teaspoon salt
- 1/2 cup fruit jam (raspberry or apricot works well)
Instructions
- Preheat the oven to 350°F (175°C). Line a baking sheet with parchment paper.
- In a large bowl, cream together the softened butter and powdered sugar until light and fluffy. Stir in the vanilla extract and rose water.
- Gradually add the flour and salt, mixing until just combined. Fold in the chopped pistachios.
- Use a tablespoon to scoop the dough, rolling it into small balls. Place them on the prepared baking sheet, spacing them a few inches apart.
- Make an indentation in the center of each dough ball using your thumb or the back of a measuring spoon. Fill each indentation with a small amount of fruit jam.
- Bake for 12-15 minutes, or until the edges are lightly golden. Allow to cool on the baking sheet for a few minutes before transferring to a wire rack to cool completely.
Pumpkin Spice Thumbprint Cookies with Cream Cheese Frosting
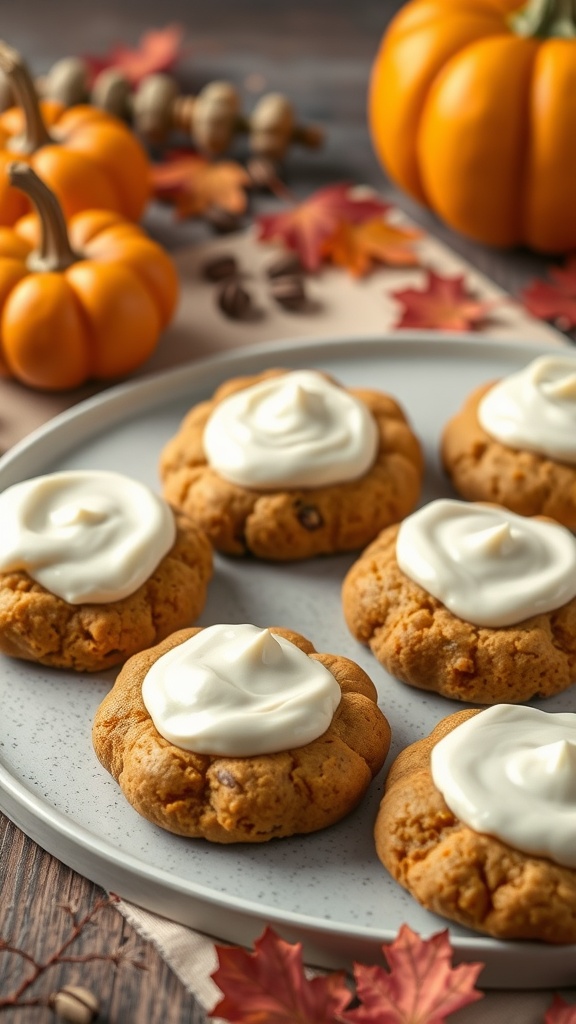
Pumpkin Spice Thumbprint Cookies are a delightful treat that combines the warm flavors of fall with a creamy topping. These cookies have a soft, chewy texture and are infused with pumpkin spice, making them perfect for autumn gatherings or cozy nights at home.
Simple to prepare, these cookies will fill your kitchen with an inviting aroma. The cream cheese frosting adds a rich, tangy sweetness that balances the spices beautifully. Enjoy them with a cup of coffee or tea!
Ingredients
- 1 cup unsalted butter, softened
- 1 cup granulated sugar
- 1/2 cup brown sugar, packed
- 1 cup pumpkin puree
- 2 teaspoons vanilla extract
- 2 1/2 cups all-purpose flour
- 1 teaspoon baking soda
- 1 teaspoon baking powder
- 1 teaspoon ground cinnamon
- 1/2 teaspoon ground nutmeg
- 1/2 teaspoon ground ginger
- 1/4 teaspoon salt
- 1 cup cream cheese, softened
- 2 cups powdered sugar
- 1 teaspoon vanilla extract (for frosting)
Instructions
- Preheat the oven to 350°F (175°C). Line a baking sheet with parchment paper.
- In a large bowl, cream together the softened butter, granulated sugar, and brown sugar until light and fluffy. Mix in the pumpkin puree and vanilla extract.
- In another bowl, whisk together the flour, baking soda, baking powder, cinnamon, nutmeg, ginger, and salt. Gradually add this dry mixture to the wet ingredients, stirring until combined.
- Using your hands, roll the dough into small balls and place them on the prepared baking sheet. Make a small indentation in the center of each ball using your thumb.
- Bake for 12-15 minutes or until the edges are lightly golden. Allow cooling on the baking sheet for a few minutes before transferring to a wire rack.
- While the cookies are cooling, prepare the frosting by beating together the cream cheese, powdered sugar, and vanilla until smooth and creamy.
- Once the cookies are completely cool, spoon or pipe the cream cheese frosting into the thumbprints and serve. Enjoy!
Orange Zest Thumbprint Cookies with Cream Filling

These Orange Zest Thumbprint Cookies are a delightful twist on the classic recipe. With their bright citrus flavor and creamy filling, they offer a refreshing taste that’s both light and satisfying. The combination of buttery cookie and zesty orange makes for a tasty treat that’s perfect for any occasion.
Making these cookies is pretty straightforward, so even if you’re a beginner, you’ll have no trouble whipping them up. The simple process of mixing, shaping, and filling allows for some fun in the kitchen. Let’s dive into the recipe!
Ingredients
- 1 cup unsalted butter, softened
- 1/2 cup granulated sugar
- 2 cups all-purpose flour
- 1/2 teaspoon baking powder
- 1/4 teaspoon salt
- 2 tablespoons orange zest
- 1/2 cup orange marmalade
- 1/2 cup cream cheese, softened
- 1 cup powdered sugar
- 1 teaspoon vanilla extract
Instructions
- Preheat the oven to 350°F (175°C). Line a baking sheet with parchment paper.
- In a bowl, cream together the softened butter and sugar until light and fluffy. Gradually mix in the flour, baking powder, salt, and orange zest until a dough forms.
- Roll the dough into small balls and place them on the prepared baking sheet. Use your thumb to create an indentation in the center of each ball.
- Fill each indentation with a little orange marmalade.
- Bake for 12-15 minutes or until the edges are lightly golden. Allow them to cool on a wire rack.
- While the cookies cool, mix together the cream cheese, powdered sugar, and vanilla extract until smooth. Once the cookies are cool, drizzle the cream filling over the top.
Caramel Thumbprint Cookies with Sea Salt
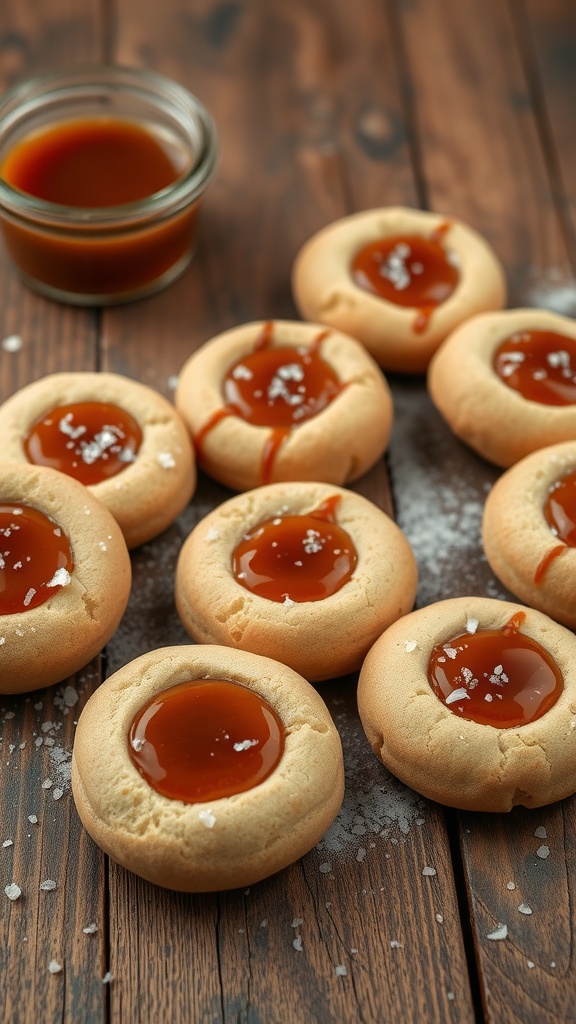
Caramel thumbprint cookies are a delightful treat that perfectly balance sweet and salty flavors. With a buttery, melt-in-your-mouth texture, these cookies become even more irresistible when filled with rich caramel and topped with a sprinkle of sea salt.
Making these cookies is simple and fun, making them a great option for both experienced bakers and those new to the kitchen. They’re perfect for sharing at gatherings or enjoying with a cup of coffee or tea.
Ingredients
- 1 cup unsalted butter, softened
- 1/2 cup granulated sugar
- 1/4 cup brown sugar, packed
- 2 teaspoons vanilla extract
- 2 cups all-purpose flour
- 1/4 teaspoon salt
- 1 cup caramel sauce
- Sea salt, for sprinkling
Instructions
- Preheat the oven to 350°F (175°C). Line a baking sheet with parchment paper.
- In a large bowl, cream together the softened butter, granulated sugar, and brown sugar until light and fluffy. Stir in the vanilla extract.
- Gradually add the flour and salt, mixing until just combined to form a soft dough.
- Roll the dough into 1-inch balls and place them on the prepared baking sheet, spacing them about 2 inches apart.
- Using your thumb, create a small indent in the center of each dough ball. Bake for about 10-12 minutes, or until the edges are lightly golden.
- Remove the cookies from the oven and immediately fill each indent with caramel sauce. Sprinkle a pinch of sea salt on top.
- Allow the cookies to cool on the baking sheet for a few minutes before transferring them to a wire rack to cool completely.
Chai Spice Thumbprint Cookies with Vanilla Bean

Chai spice thumbprint cookies are a delightful twist on the classic thumbprint cookie, bringing together warm spices and a sweet filling. The combination of cardamom, cinnamon, and ginger gives each bite a cozy flavor that reminds you of a comforting cup of chai. These cookies are not only easy to whip up but also perfect for sharing during the holidays or enjoying with a cup of tea.
The buttery base pairs beautifully with a fruity filling, making these cookies both visually appealing and deliciously satisfying. Whether you’re an experienced baker or just starting out, this recipe is straightforward and fun to make, allowing for creativity in choosing your favorite jam or curd for the center.
Ingredients
- 1 cup unsalted butter, softened
- 3/4 cup granulated sugar
- 2 cups all-purpose flour
- 1/2 teaspoon baking powder
- 1 teaspoon ground cinnamon
- 1/2 teaspoon ground cardamom
- 1/2 teaspoon ground ginger
- 1/4 teaspoon salt
- 1 teaspoon vanilla bean paste
- 1/2 cup fruit preserves (your choice)
Instructions
- Preheat the oven to 350°F (175°C) and line a baking sheet with parchment paper.
- In a large bowl, cream together the softened butter and granulated sugar until light and fluffy.
- In another bowl, whisk together the flour, baking powder, cinnamon, cardamom, ginger, and salt.
- Gradually add the dry ingredients to the butter mixture, mixing until just combined. Stir in the vanilla bean paste.
- Roll the dough into 1-inch balls and place them on the prepared baking sheet, spacing them about 2 inches apart.
- Using your thumb, press down gently in the center of each ball to create an indentation.
- Fill each thumbprint with a teaspoon of fruit preserves.
- Bake for 12-15 minutes, or until the edges are lightly golden. Allow to cool on the baking sheet for a few minutes before transferring to a wire rack to cool completely.
Blueberry Thumbprint Cookies with Almond Glaze
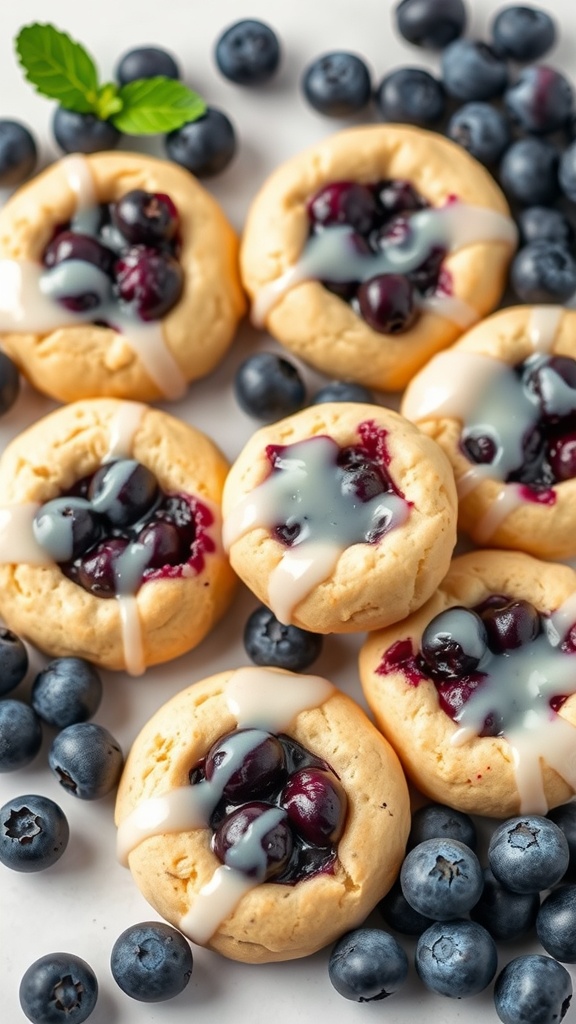
Blueberry thumbprint cookies are a delightful treat that perfectly blend sweetness and fruitiness in each bite. These cookies feature a buttery base with a lovely blueberry filling, finished with a drizzle of almond glaze for a touch of elegance. They’re simple to make and a delightful way to enjoy fresh blueberries, especially during the summer months.
The combination of the soft cookie and tart blueberries creates a wonderful flavor experience, while the almond glaze adds a nutty sweetness that ties it all together. Whether you’re enjoying them with a cup of tea or serving them at a gathering, these cookies are sure to be a hit!
Ingredients
- 1 cup unsalted butter, softened
- 3/4 cup granulated sugar
- 1 large egg yolk
- 1 teaspoon vanilla extract
- 2 cups all-purpose flour
- 1/4 teaspoon salt
- 1/2 cup blueberry preserves
- 1 cup powdered sugar
- 2 tablespoons almond milk
- 1/4 teaspoon almond extract
Instructions
- Make the Dough: In a mixing bowl, cream together the softened butter and granulated sugar until light and fluffy. Add the egg yolk and vanilla extract, mixing until well combined. Gradually add the flour and salt, mixing until a dough forms.
- Shape the Cookies: Preheat your oven to 350°F (175°C). Roll the dough into small balls and place them on a baking sheet lined with parchment paper. Use your thumb to create an indentation in the center of each ball.
- Add the Filling: Spoon a small amount of blueberry preserves into each indentation, filling them generously.
- Bake: Bake the cookies for 12-15 minutes, or until the edges are lightly golden. Allow them to cool on a wire rack.
- Prepare the Glaze: In a small bowl, whisk together powdered sugar, almond milk, and almond extract until smooth. Drizzle the glaze over the cooled cookies.
S’mores Thumbprint Cookies with Marshmallow Filling

If you’re craving the classic flavors of s’mores, these thumbprint cookies are a delightful twist! Loaded with chocolate and topped with a gooey marshmallow filling, they bring all the joy of a campfire treat into cookie form. The soft, buttery cookie base combined with rich chocolate makes for a comforting dessert that’s perfect for any occasion.
Not only are these cookies easy to make, but they also promise a fun baking experience. Kids and adults alike will enjoy rolling the dough and creating those signature thumbprint wells. Get ready to impress your family and friends with these tasty treats!
Ingredients
- 1 cup unsalted butter, softened
- 3/4 cup granulated sugar
- 3/4 cup brown sugar, packed
- 1 teaspoon vanilla extract
- 2 large eggs
- 2 1/2 cups all-purpose flour
- 1 teaspoon baking soda
- 1/2 teaspoon salt
- 1 cup chocolate chips
- 1 cup marshmallow fluff
- 1/2 cup graham cracker crumbs
Instructions
- Preheat the oven to 350°F (175°C) and line a baking sheet with parchment paper.
- In a large bowl, cream together the softened butter, granulated sugar, and brown sugar until light and fluffy. Add the eggs and vanilla extract, mixing until combined.
- In another bowl, whisk together the flour, baking soda, and salt. Gradually add this dry mixture to the wet ingredients, mixing until just combined. Stir in the chocolate chips.
- Using your hands, form small balls of dough (about 1 inch in diameter) and place them on the prepared baking sheet, spaced about 2 inches apart.
- With your thumb or the back of a spoon, make an indentation in the center of each dough ball.
- Bake for 10-12 minutes or until the edges are lightly golden. Remove from the oven and immediately fill each indented thumbprint with a dollop of marshmallow fluff.
- Sprinkle graham cracker crumbs on top of the marshmallow fluff and return to the oven for an additional 2-3 minutes, allowing the marshmallow to get lightly toasted.
- Let the cookies cool on the baking sheet for a few minutes before transferring to a wire rack to cool completely.